
Ingredients and knowledge:
The aim is simple, as you trick your friend with a fake FACEBOOK page, they’ll input their username and password on your fake web page. The following are the “ingredients” to create our “Evil Phishing Site”.
1) WAMP server (A Must for NOOB) – For this tutorial purpose, I’ll suggest you to use this dummy server as it allows your PC to act as a server. It supports Apache, MySQL, and PHP on Windows. This is where you host your “Evil Phishing Site”. Download at: http://www.wampserver.com/en/download.php
2) Macromedia Dreamweaver 8 (Optional) - This is the most standard and common web language tool to create a website. However, if you are lazy to download it, write the HTML code on the NOTEPAD would do the same trick.
3) WinAutomation(A Must for NOOB) – This is the program allow you to create an execution file to trick your friend execute it. Download at: http://www.winautomation.com/download.html
*Unless you are able to write a win command script, you won't need it
HTML, CSS, JavaScript are the least requirements you should know to create this simplest fake site.
Else, you may spend around 30 minutes (10 minutes each) to self-study at http://www.w3schools.com/. In fact, it is not a big deal, you should be able to understand them within half an hour.
Step 1:
Capture a screen-shot on FACEBOOK login page (or some of you guys like to call it as “print screen”). Just do a cropping modification and erase the LOGIN Button, “username” and “password” textboxes in PAINT, PHOTOSHOP, or Windows Office Picture Manager, and save it as bitmap format (jpeg might decrease the quality of the picture, you don’t wanna raise the attention of your friends right?) and you will get the almost similar output as mine which is shown at below:

Save it as “login.jpeg”.
Step 2
Next, we’ll add the input textboxes in HTML format for both username and password respectively. The HTML codes are:

If you don’t have the Macromedia Dreamweaver, don’t worry. Write in the NOTEPAD would do the same trick:

The codes are fairly simple and the drawback is: its lack of security concern. But what the h3ll, we just want our friend’s password, that’s all.
Either you’re using Macromedia Dreaweaver or NOTEPAD, be sure you save it as “index.php”. You can save it as “index.html” as well, but “index.php” allows you to add on the php functions in the future, just in case you wanna steal your friends’ username/password and store into the WAMP Server without their notices.
Hold on,
 we’re not yet done the coding part. Now we got our fake button and textboxes, we still need to allocate it in the right place on the background. Therefore, I’m using CSS to do the trick:
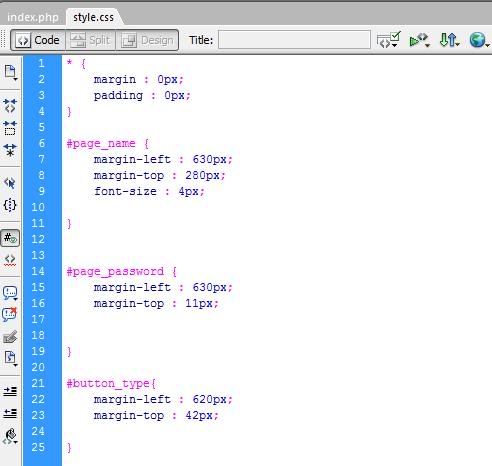
Save it as “style.css” (You can write it in a notepad as well, heeeee)
*remember to re-adjust your margin point, because the margin point I set might be different to yours
Now, if you have installed WAMP server at C: drive, your path should be C:\wamp\www. Copy the “index.php”, “login.jpeg”, ”style.css”, and “untitled.bmp” and paste it at C:\wamp\www. Overwrite the previous “index.php”.
Step 3
Now you going to start the WAMP server, go to “start WampServer” . Then “Start All Service”.
Now, go to web browser (I’m using firefox) and at the link there, type “localhost” and press Enter. You will see your “Master Piece” come out:


Ok, I won’t say it’s a real master piece, but if you got the time, passion and evil spirit, you may modify it into better version. Note that the Login buttons and the textboxes input text color is NOT the same with the original FACEBOOK site, the link about Sign up, Advertising, Help Center won’t work either. (Bare with me, even though I’m a villain but I have to work to earn a living as well)
Step 4 (You’re almost done)
For your understanding, you try to open: "C:\Windows\System32\drivers\etc\ host" with NOTEPAD. You’ll see:
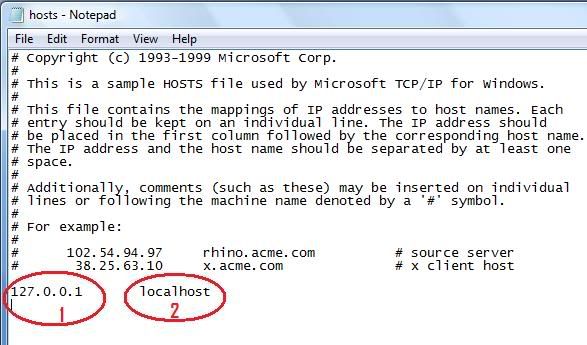
1) It’s the IP of the website, by default when you’re connecting to your own localhost server. When you install WAMP server, it act as the localhost. Therefore at Step 3, when you type the “localhost”, it directs you to 127.0.0.1, where you evil site is resides at.
2) The “localhost” word can be change into whatever web site name you want, for example www.google.com, www.handsome.com, www.evil.com or www.facebook.com. You try it by changing the “locahost” to "www.facebook.com"
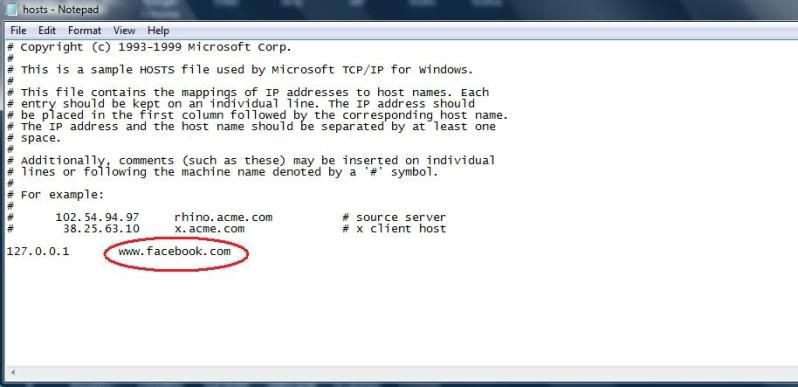
Now, when you repeat the Step 3, by typing in “localhost”, it will show nothing. However, when you type in www.facebook.com, it will show your evil site:

In fact, if you got other web sites on other machines, let’s say the server IP is 192.168.0.7, you may add on in the following manner:

Therefore when your friends visit www.handsome.com, but they ended up redirect to the server 192.168.0.7.
Step 5
So, my fellow villains, go the concept? The remaining problem is how to TRICK your friend to change the content of the “hosts” file?
There are many ways of doing it, usually people write in windows bash shell script or vb script. Currently I have to admit that I haven’t master the script yet. For more info on the script, you can always visit my Master at http://werew01f.blogsopt.com.
In this example, we’ll be using the Win Automation tool, a free trial version (Of course you can buy it if you’re affordable).
Now, execute the WinAutomation and “Create a New Job”. The Job name is: “Click Me”, click “Ok”

Next, choose “File”, and then double click “Write Text To File”.

A new screen will prompt for your action, fill in as the following:

The "Text To Write" is exactly same as the content in the "hosts" file, just copy and paste. Remember to change "localhost" into "www.facebook.com".
Save the job, close the screen, back to main screen. Now the new job is on the list, right click and choose for “Generate.exe”. Muahaha, now you notice…. (In fact you can do a lot of evil stuff with Win Automation)

*When you generate EXE, it will tell you it won’t look like at EXE file, you need the Win Automation PRO (Purchase version) ….blah blah blah.....
 just ignore it, and click open. So go to the destination path it’s saved and just a single double click, it will help you do the tasks at Step 4.
Punishment time:
Run the "Click Me.exe" on your friends computer, either you run it or they run it themselves.

When they navigate into FACEBOOK, they will get the following after they inputted their usernameand password.

Summary:
Note that the Login Button onclick will trigger a JavaScript function, which is a pop out message to the user to show their username and password. If you want to do it in conceal way, let’s say store into your database, you can always add on the php function with MySQL statements. But you gonna figure it out yourself, I’ll post how to do it in the later post, so you can get back here to practice it yourself. Note that I’m using Dummy WAMP server. In real case, we’ll be using a remote Server IP (instead of localhost 127.0.0.1), and that...you have to study other way to setup a remote server for your evil website. I hope this NOOB guide will give you a better concept and understanding, and hopefully you will get the concept.
Good luck and have fun.
